Setting up React Authentication using JWT
In this article, we would be Using ReactJS and ExpressJS to show how to manage React authentication in SPAs.
Authentication on SPAs can be tricky considering the various methods of authentication at our disposal such as Auth0 (which is an Auth-as-a-service platform), njwt, Okta. amongst others.
For the purpose of this article, I have chosen JsonWebToken(JWT).
We would be creating a developer tips application that allows every user to view regular tips and allow only authenticated users to view special tips.
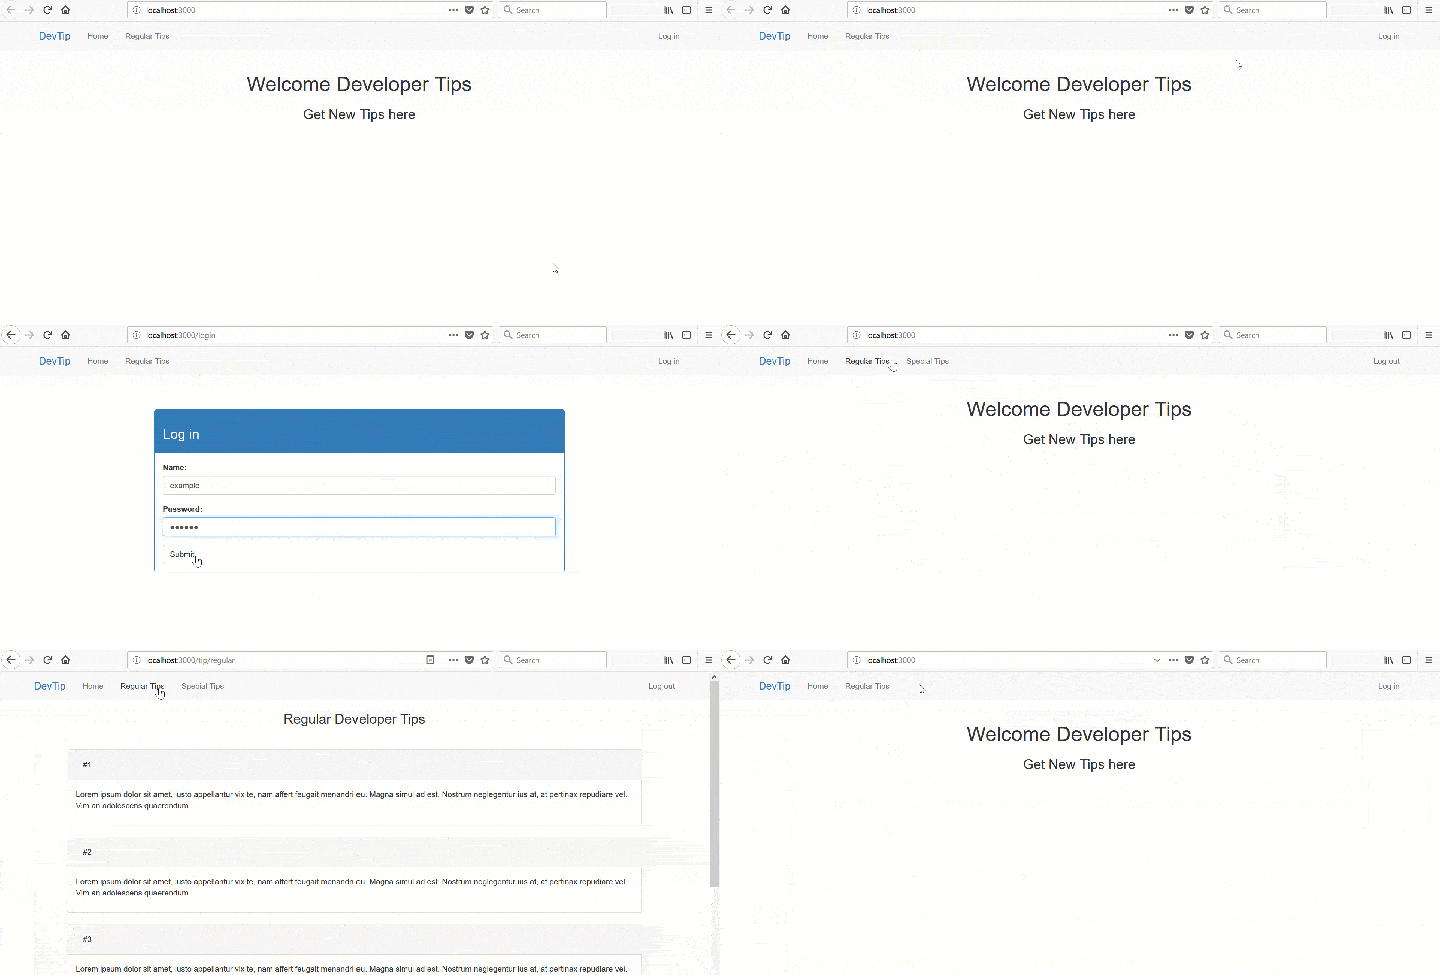
Below is the demo of our app

Let’s get started by creating the API for our app:
Setting up the Backend
We would first develop the API which would be consumed by the ReactJS frontend.
Let’s get started by the creating directories, files and initializing the project:
mkdir api
cd api
touch server.js
touch data.js
touch middleware.js
now run the following command to create a package.json file
npm initInstall the dependencies
To install the dependencies for our API execute the following commands:
npm i nodemon --save-dev
npm install --save express jsonwebtoken cors body-parser- Axios – It is a Promise based HTTP client for the browser and NodeJS. we would be using it to fetch data for our ReactJS frontend.
- JsonWebTokem(JWT) – It is a compact and self-contained way for securely transmitting information between parties as a JSON object.
Next, open up package.json and alter the scripts section to read as follows:
"scripts": {
  "start": "nodemon server.js"
},
Open up server.js file and add the following code:
'use strict';

const express = require('express');
 const app = express();
 const jwt = require('jsonwebtoken');
 const cors = require('cors');
 const bodyParser = require('body-parser');
 const data = require('./data');
 const middleware = require('./middleware');

app.use(bodyParser.json());
 app.use(bodyParser.urlencoded({ extended: true }));
 app.use(cors());

app.get('/api/tips/regular', (req, res) => {
 res.json(data.regular);
 });

app.get('/api/tips/special', middleware, (req,res) => {
 res.json(data.special);
 });

app.post('/api/auth', (req,res) => {
 let user = data.users.filter((user) => {
 return user.name == req.body.name && user.password == req.body.password;
 });
 if (user.length){
 let token_payload = {
 name: user[0].name,
 password: user[0].password
 };
 // create a token using user name and password vaild for 2 hours
 let token = jwt.sign(
 token_payload,
 "jwt_secret_password",
 { expiresIn: '2h' }
 );
 let response = {
 message: 'Token Created, Authentication Successful!',
 token: token
 };

// return the information including token as JSON
 return res.status(200).json(response);

} else {
 return res.status("409")
 .json("Authentication failed. admin not found.");
 }
 });
 let port = 3100;
 app.listen(port);
 console.log('api runnging on port '+ port +': ');
The server.js file sets up the API and it provides three routes which include:
- The Regular tips route to provide regular tips to both authenticated and unauthenticated users from the data.js file (which we would soon create).
- The Authentication Route which authenticates users if they are found in the list of provided users from data.js. It returns a token generated from the token payload (This usually includes the user information such as email, name, phone number, and others).
- The Special tips route provides special tips to only authenticated users. It uses a middleware which expects the valid token to be provided before it grants access. The middleware is written in the middleware.js file in the API folder. middleware.js should contain the code below.
const jwt = require('jsonwebtoken');

const JWT_SECRET = "jwt_secret_password";

module.exports = (req, res, next) => {

// check header or url parameters or post parameters for token
 var token = req.body['x-access-token'] || req.query['x-access-token'] || req.headers['x-access-token'];

// decode token
 if (token) {

// verifies secret and checks exp
 jwt.verify(token, JWT_SECRET, function(err, decoded) {
 if (err) {
 return res.status(403).send({
 success: false,
 message: 'Failed to authenticate token.'
 });
 } else {
 // if everything is good, save to request for use in other routes
 req.decoded = decoded;
 next();
 }
 });
 } else {
 // if there is no token, return an error
 return res.status(403).send({
 success: false,
 message: 'No token provided.'
 });
 }
 };
The data.js file which acts as the data source for our application and should look like this:
const regular = [
 {
 id: 01,
 content: 'Lorem ipsum dolor sit amet, iusto appellantur vix te, nam affert.'
 },
 {
 id: 02,
 content: 'Lorem ipsum dolor sit amet, iusto appellantur vix te, nam affert.'
 },
 {
 id: 03,
 content: 'Lorem ipsum dolor sit amet, iusto appellantur vix te, nam affert.'
 },
 {
 id: 04,
 content: 'Lorem ipsum dolor sit amet, iusto appellantur vix te, nam affert.'
 },
 {
 id: 05,
 content: 'Lorem ipsum dolor sit amet, iusto appellantur vix te, nam affert.'
 }
 ];
 const special = [
 {
 id: 11,
 content: 'Lorem ipsum dolor sit amet, iusto appellantur vix te, nam affert. '
 },
 {
 id: 12,
 content: 'Lorem ipsum dolor sit amet, iusto appellantur vix te, nam affert.'
 },
 {
 id: 13,
 content: 'Lorem ipsum dolor sit amet, iusto appellantur vix te, nam affert. '
 },
 {
 id: 14,
 content: 'Lorem ipsum dolor sit amet, iusto appellantur vix te, nam affert. '
 },
 {
 id: 15,
 content: 'Lorem ipsum dolor sit amet, iusto appellantur vix te, nam affert. '
 },
 {
 id: 16,
 content: 'Lorem ipsum dolor sit amet, iusto appellantur vix te, nam affert. '
 }
 ];

const users = [
 {
 'name': 'user', 'password': 'qwerty'
 },
 {
 'name': 'example', 'password': 'qwerty'
 }
 ]

module.exports = { regular: regular, special: special, users: users }
Now, start the node server by executing the following commands:
npm run startTesting the API
Start up the PostMan App to test create the method of our API
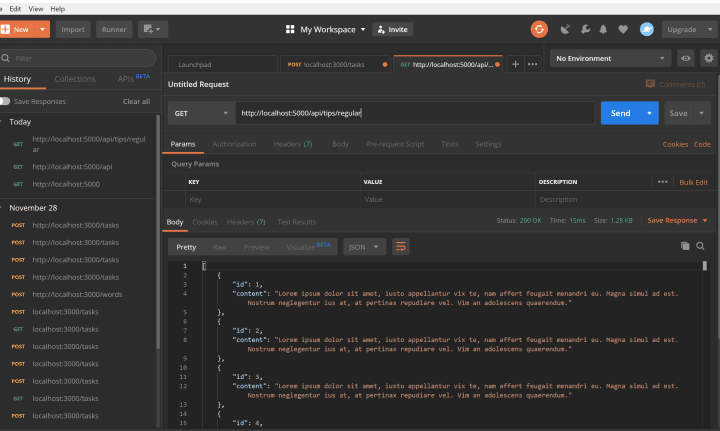
We’ll start off by creating a new Tasks lists. Select POST as the method and enter http://localhost:5000/api/tips/regular as the URL.

you will receive the JSON Data from the server.
Building the Frontend
For this Tutorial, I am Using CodeMix IDE, you can use any IDE or editor including VsCode or Atom.
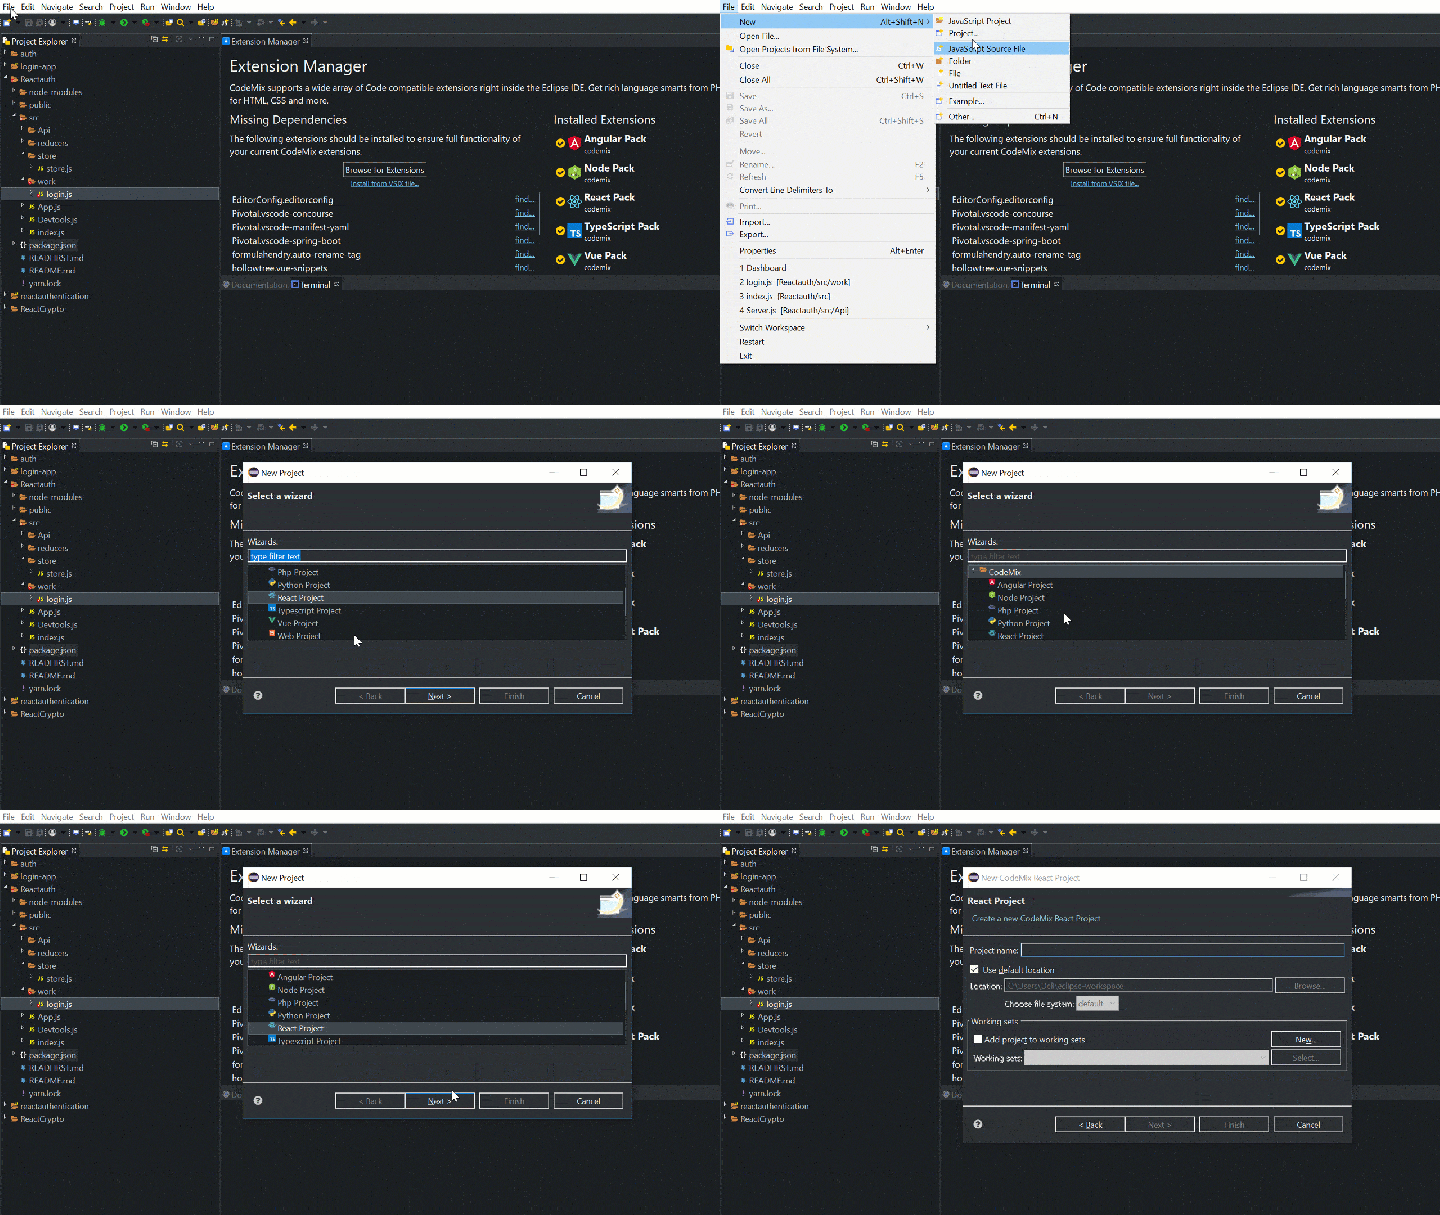
We’ll be using the latest version of all the tech libraries and stacks as at the time of this writing. To create a new React Project Navigate to File-> New -> Project

Now click next and enter your project name in the next Screen, Finally, click Finish to continue with React project creation.
Let’s Install Dependencies for our React App by executing the Following Command:
npm install --save react-router-dom
npm install --save  axios
Now we will create directories and files for our app, alternatively, you create directories & files by right-clicking on files and selecting new.
cd src
touch App.js
touch repository.js
touch registerServiceWorker.js
mkdir Components
touch Home.js
touch Regular.js
touch Login.js
touch Special.js
Since we are using react-router-dom as our router we have to enclose all Link and Route elements in a Router (originally named BrowserRouter) element. The App.js file should look like this.
import React, { Component } from 'react';
import Login from './components/login';
import Regular from './components/regular';
import Special from './components/special';
import Home from './components/home';
import {  BrowserRouter as Router, Link, Route } from 'react-router-dom';
import { isAuthenticated } from './respository';


class App extends Component {

  logOut(){
    localStorage.removeItem('x-access-token');
  }

  render() {
    return (
      <Router>
      <div>
        <nav className="navbar navbar-default">
          <div className="container-fluid container">
            <div className="navbar-header">
              <span className="navbar-brand"><Link to="/"> DevTip</Link></span>
            </div>
            <ul className="nav navbar-nav">
              <li>
                <Link to="/">Home</Link>
              </li>
              <li>
                <Link to="/tip/regular">Regular Tips</Link>
              </li>
              <li>
                {
                 ( isAuthenticated() ) ? <Link to="/tip/special">Special Tips</Link>:  ''
                }
              </li>
            </ul>
            <ul className="nav navbar-nav navbar-right">
             {
               ( isAuthenticated() ) ?
                ( <li onClick={this.logOut}><a href="/">Log out</a> </li>) :
                ( <li><Link to="/login">Log in</Link></li> )
             }
            </ul>
          </div>
        </nav>
        <Route exact path="/" component={Home} />
        <Route exact path="/tip/regular" component={Regular} />
        <Route exact path="/tip/Special" component={Special} />
        <Route exact path="/login" component={Login} />
      </div>
      </Router>
    );
  }
}

export default App;
The isAuthenticated function checks to see if the user is authenticated and return a boolean to that effect. Hence the Special tips Link and log out Link is only shown to authenticated users while the log in Link is shown to only unauthenticated users.
The isAuthenticated function is housed in a repository.js file (in the src folder), which stores functions needed by the various react component we would be creating.
The repository.js contains the method which communicates with the API using Axios. It provides methods such as:
- getRegularTips – which fetches the regular tips from the API.
- login – which sends a post request with user information and get an access token on success. It then stores the access-token and it’s expiration time (which is 2 hours after receipt of the token) on localStorage.
- getSpecialTips – which fetches the special tip for only authenticated users.
The repository.js file should then contain the code below:
import axios from 'axios';

const BASE_URL = 'http://localhost:5000';

export function getRegularTips () {
 return axios.get(`${BASE_URL}/api/tips/regular`)
 .then(response => response.data);
 }

export function getSpecialTips () {
 return axios.get(`${BASE_URL}/api/tips/special`, { params: { 'x-access-token': localStorage.getItem('x-access-token')} })
 .then(response => response.data)
 .catch(err => Promise.reject('Request Not Authenticated!'));
 }

export function login (data) {
 return axios.post(`${BASE_URL}/api/auth`, { name: data.name, password: data.password })
 .then(response => {
 localStorage.setItem('x-access-token', response.data.token);
 localStorage.setItem('x-access-token-expiration', Date.now() + 2 * 60 * 60 * 1000);
 return response.data
 })
 .catch(err => Promise.reject('Authentication Failed!'));
 }

export function isAuthenticated(){
 return localStorage.getItem('x-access-token') && localStorage.getItem('x-access-token-expiration') > Date.now()
 }
Now we can start building the other set of the component which includes the following components:
- Home Component– This component handles what is to be displayed on the homepage. It is created in the components folder as home.js and should contain the code below.
import React, { Component } from 'react';

class Home extends Component {

render() {

return (
 <div>
 <hr/>
 <h1 className="text-center">Welcome Developer Tips</h1>
 <div className="">
 <h3 className="text-center">Get New Tips here</h3>
 </div>
 <hr/>
 </div>
 );
 }
 }

export default Home;
Regular Component– This component is responsible for handling the display of regular tip for public viewing. It is created in the components folder as regular.js and should contain the code below.
import React, { Component } from 'react';
import { getRegularTips } from '../respository';

class Regular extends Component {

  constructor() {
    super();
    this.state = { tips: [] };
  }

  componentDidMount() {
    getRegularTips().then((tips) => {
      this.setState({ tips });
    });
  }

  render() {

    return (
      <div>
        <h3 className="text-center">Regular Developer Tips</h3>
        <hr/>
        {
          this.state.tips.map((tip) => (
              <div className="col-sm-10 col-sm-offset-1" key={tip.id}>
                <div className="panel panel-default">
                  <div className="panel-heading">
                    <h3 className="panel-title"> <span className="btn">#{ tip.id }</span></h3>
                  </div>
                  <div className="panel-body">
                    <p> { tip.content } </p>
                  </div>
                </div>
              </div>
          ))
        }
      </div>
    );
  }
}

export default Regular;
It Fetches the data to be displayed by calling the getRegularTips function after the component has been mounted (i.e it uses calls the getRegularTips function in the ReactJs componentDidMount event handler). It then stores the data which is an array of tips objects in the component state then displays the data by iteration through the tips array.
Login Component – This component is responsible for submitting the user information to the API and getting the token. It is created as login.js in the components folder and contains the code below.
import React, { Component } from 'react';
 import { login } from '../respository';

class Login extends Component {
 constructor() {
 super();
 this.state = { name: '', password: '' };
 this.handleInputChange =this.handleInputChange.bind(this);
 this.submitLogin =this.submitLogin.bind(this);
 }

handleInputChange(event) {
 this.setState({[event.target.name]: event.target.value})
 }

submitLogin(event){
 event.preventDefault();
 login(this.state)
 .then(token => window.location = '/')
 .catch(err => alert(err));
 }

render() {
 return (
 <div className="container">
 <hr/>
 <div className="col-sm-8 col-sm-offset-2">
 <div className="panel panel-primary">
 <div className="panel-heading">
 <h3>Log in </h3>
 </div>
 <div className="panel-body">
 <form onSubmit={this.submitLogin}>
 <div className="form-group">
 <label>Name:</label>
 <input type="text" className="form-control" name="name"
 onChange={this.handleInputChange}/>
 </div>
 <div className="form-group">
 <label>Password:</label>
 <input type="password" className="form-control" name="password"
 onChange={this.handleInputChange}/>
 </div>
 <button type="submit" className="btn btn-default">Submit</button>
 </form>
 </div>
 </div>
 </div>
 </div>
 );
 }
 }
 export default Login;
The handleInputChange gets the user input and saves them to the component state using the input field name which corresponds to the initial state attributes (name and password).
The submitLogin handles the on submit event of the login form. It calls the login function from repository.js responds to its response. In the event of a failed login attempt, it alerts the user while in the event of a successful login attempt redirects the user to home with the access token saved in localStorage hence revealing and unblocking the special tips link.
Special Component – This component is responsible for loading the Special tips for authenticated users only. It is created as special.js in the components folder with and contains the code below.
import React, { Component } from 'react';
 import { getSpecialTips, isAuthenticated } from '../repository';
 import { Redirect } from 'react-router-dom';

class Special extends Component {

constructor() {
 super();
 this.state = { tips: [], auth: true };
 }

componentDidMount() {
 if( isAuthenticated() )
 getSpecialTips().then((tips) => {
 this.setState({ tips });
 }).catch(err => {
 alert('User Not Authenticated');
 this.setState({auth: false}
 )})
 else{
 alert('User Not Authenticated');
 this.setState({auth: false})
 }
 }

render() {

return (
 <div>
 {(this.state.auth) ? '' : <Redirect to="/" />}
 <h3 className="text-center">Special Developer Tips</h3>
 <hr/>
 {
 this.state.tips.map((tip) => (
 <div className="col-sm-10 col-sm-offset-1" key={tip.id}>
 <div className="panel panel-success">
 <div className="panel-heading">
 <h3 className="panel-title">
 <span className="btn">#{ tip.id }</span></h3>
 </div>
 <div className="panel-body">
 <p> { tip.content } </p>
 </div>
 </div>
 </div>
 ))
 }
 </div>
 );
 }
 }
 export default Special;
It is similar to the Regular Component with a few changes. After the Component has been mounted it checks to see if the user has been authenticated using the isAuthenticated function.
If the user is authenticated (that is if there is a token in the localStorage and it hasn’t expired) the request proceeds to the API server where further checks on the authentication are carried out.
If it passes the API server authentication the tips array data is stored to the state tips attribute and is then rendered. If Authentication fails at any point in this component the user is alerted and then redirected to the home page.
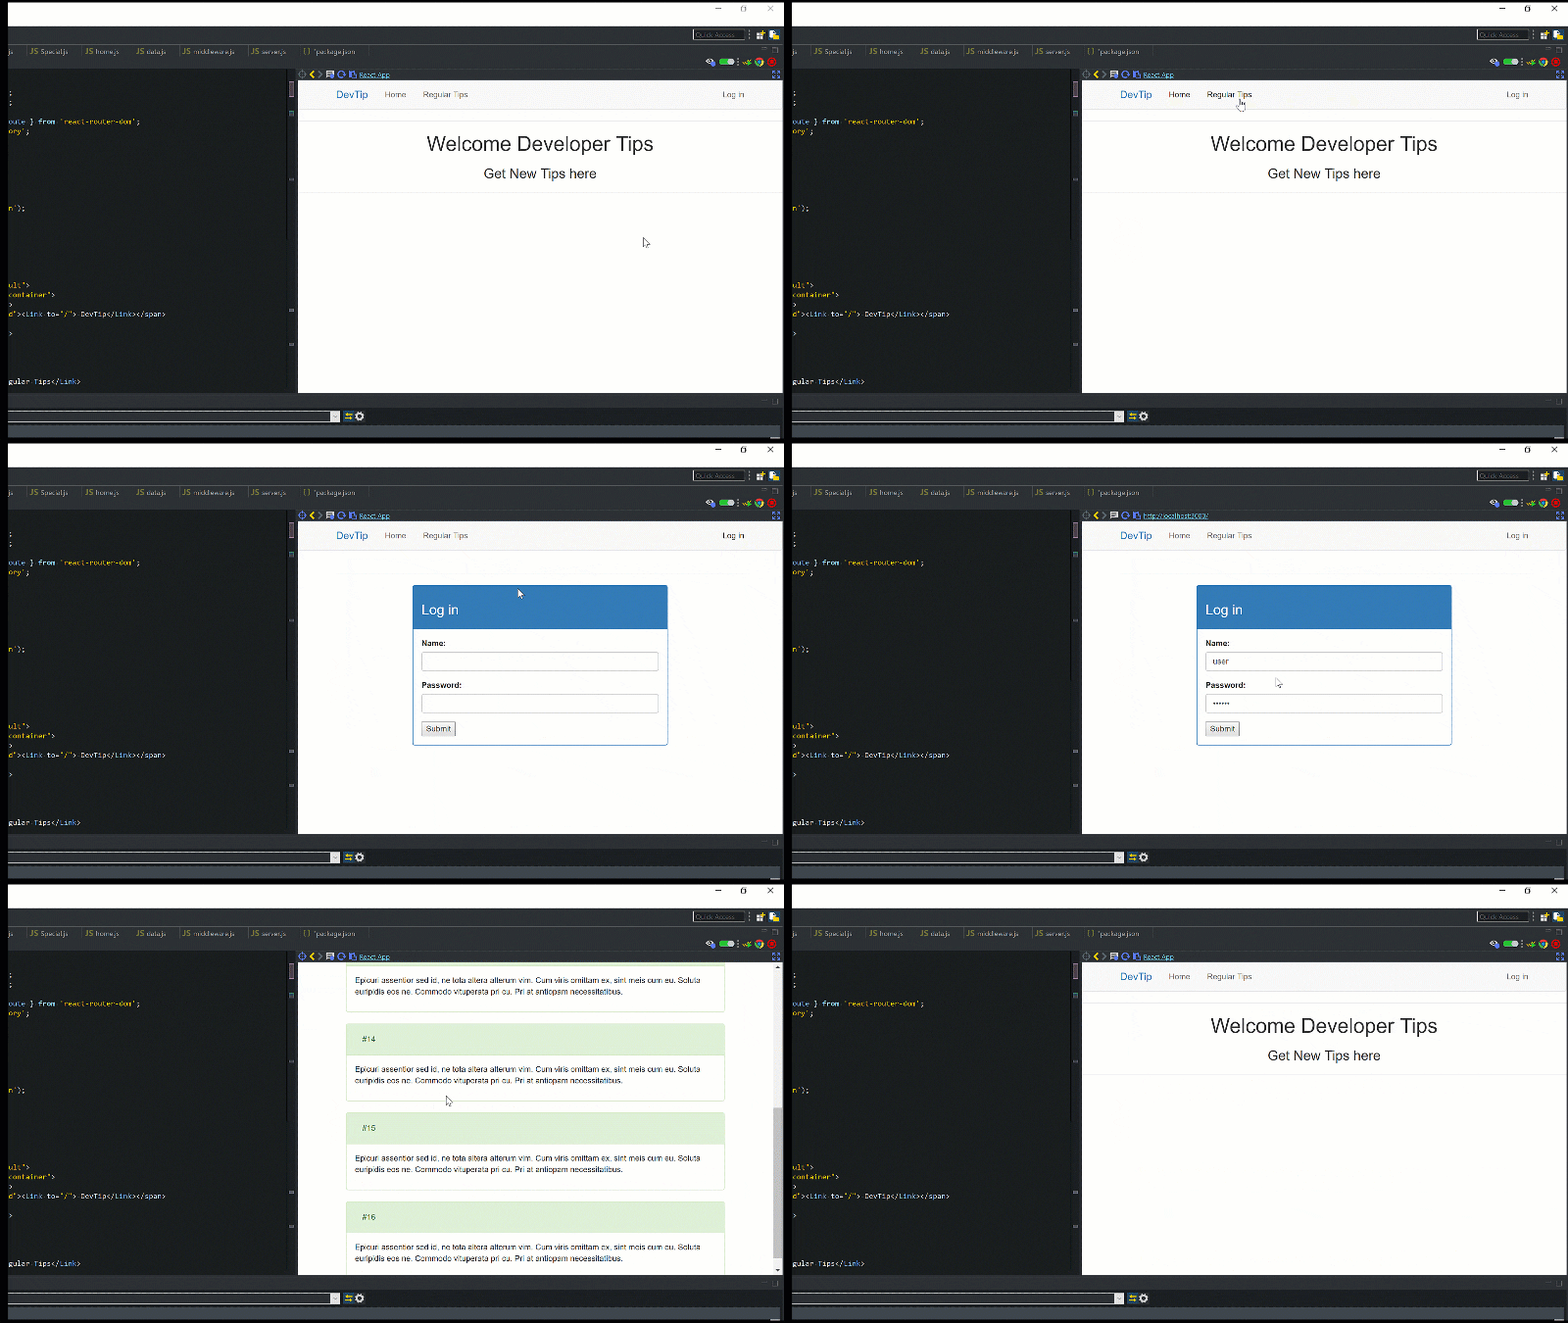
After we have successfully created all the ReactJS components for corresponding each of the routes. Let’s see how Our React app looks, by Opening Live preview panel in CodeMix.

Conclusion
In this article, we created an ExpressJS API with jsonwebtoken used to React authentication. We have learned to build our authentication middleware and attach it to various routes.
Although this is not a by any means a production-ready API, as most of our keys are stored within the application definition rather than a .env file (usually accessed by using the dotenv package), our API routes are declared within server.js file rather than being abstracted to separate routes.js file and other production practices.
We have also learned how to authenticate a user request using ReactJS with the help of localStorage. Although one might be tempted to use jsonwebtoken to check the token’s validity I advise against it as it opens the system to vulnerability as programmers can not fully protect what goes on the client system as the JWT_SECRET may be exposed.
This code for this application is available on GitHub.
