

Build a simple E-Commerce App with React Native
In this tutorial, I’ll show you to build a simple e-commerce app with React Native.
React Native is a JavaScript framework for writing mobile applications for iOS and Android. It’s based on React and React Native is so popular.
Create Login Page In React-Native with Animation
Prerequisites
Before continue reading this tutorial you will need Node.js and npm installed on your machine.
I am going to use Expo for faster development. I’ll explain what is Expo later in this article.
npm install -g expo-cliSetting up
Building mobile applications for iOS and Android require installing and configuring Xcode or Android Studio. Expo CLI sets up a development environment on your local machine and you can be writing a React Native app within minutes.
Install the Expo client app on your iOS or Android phone and connect to the same wireless network as your computer.
Let’s create a new React Native project:
expo init EcommerceApp
cd EcommerceApp
Going over what we’ll be building in this tutorial
Installing required packages
In this tutorial, we’ll use two libraries:
- react-native-elements : React Native UI elements that are easy to use & really customizable;
- react-navigation : The community solution to navigation in React Native applications.
yarn add react-native-elements
yarn add react-navigation
Once, required packages are installed, just run npm start to start the development server.
And then, you will see the following result:

We have two views on the mobile app. We should find a way to move between these views easily.
How the flow will work:
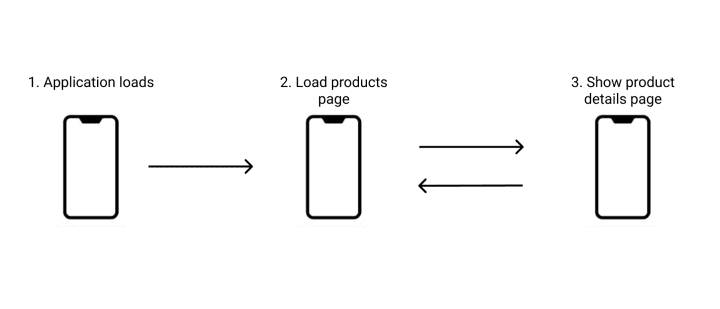
When the application loads we’ll render the products home page and product details page.
Create a src folder. And then create a stack navigator and our routes:
This is how a stack navigator looks like:
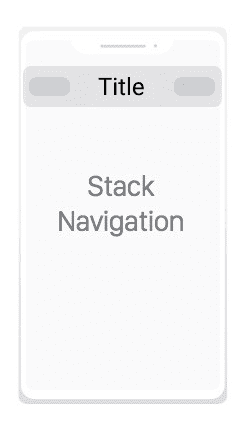
So let’s create a stack navigator and our routes:
import { createStackNavigator } from 'react-navigation';
import HomeScreen from './views/Home';
import DetailsScreen from './views/Details';

const AppNavigator = createStackNavigator(
    {
        Home: {
            screen: HomeScreen,
            navigationOptions: { title: 'Home' }
        },
        Details: {
            screen: DetailsScreen,
            navigationOptions: { title: 'Details' }
        }
    },
    {
        initialRouteName: "Home"
    }
);

export default AppNavigator;
We created the HomeScreen and the DetailsScreen. navigationOptions is useful to set up a title for the screen.
initialRouteName option sets the default screen.
If you look at our files, HomeScreen and DetailsScreen are not created yet. Create a new folder called views.
Just create a sample React components with React Native’s View and Text:
// src/views/Home.js
import React from 'react';
import { View, Text } from 'react-native';

class HomeScreen extends React.Component {
    render() {
      return (
        <View>
            <Text>Home</Text>
        </View>
      );
    }
}

export default HomeScreen;
// src/views/Details.js
import React from 'react';
import { View, Text } from 'react-native';

class DetailsScreen extends React.Component {
    render() {
      return (
        <View>
            <Text>Details</Text>
        </View>
      );
    }
}

export default DetailsScreen;
Now, remove the content from App.js file. We need to tell our app to use the stack navigator created previously.
import { createAppContainer } from 'react-navigation';
import AppNavigator from './src/AppNavigator';
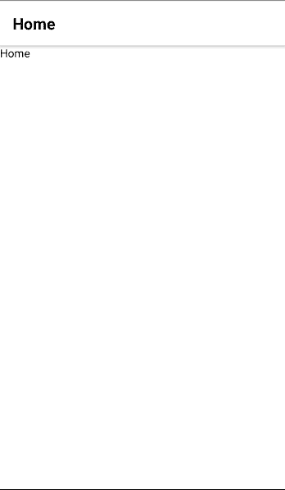
export default createAppContainer(AppNavigator);
You’ll see this on the screen.
Another challenge before making our app looks awesome is how we move from HomeScreen to DetailsPage.
// src/views/Home.js
import React from 'react';
import { View, Text, Button } from 'react-native';
import { withNavigation } from 'react-navigation';

class HomeScreen extends React.Component {
    render() {
      return (
        <View>
            <Text>Home</Text>
            <Button
                onPress={() => this.props.navigation.navigate('Details')}
                title="Open details page"
            />
        </View>
      );
    }
}

export default withNavigation(HomeScreen);
Great! In the second part of this tutorial, we’ll make our app looks great. And most essential to look like an ‘real’ e-commerce app.
Introducing Flexbox
Flexbox is an elegant layout tool in CSS3. It helps you divide space into columns & rows in your user interface.
Open src/views/Home.js and put this into it:
// src/views/Home.js
import React from 'react';
import { View, Text, StyleSheet } from 'react-native';
import { withNavigation } from 'react-navigation';

class HomeScreen extends React.Component {
    render() {
      return (
        <View style={styles.row}>
            <View style={styles.col}>
              <Text>Product here</Text>
            </View>
        </View>
      );
    }
}

const styles = StyleSheet.create({
  row: {
      flex: 1,
      flexDirection: 'row',
      justifyContent: 'center',
  },
  col: {
      flex: 1,
  },
});

export default withNavigation(HomeScreen);
We created a new style object similar to CSS StyleSheets. And define the direction of the main axis row.
React Native Elements
React Native Elements provide all-in-one UI kit for creating apps in react native: cards, button, pricing, etc.
Let’s create a new component: Product which is basically a Cardcomponent described here.
// src/components/Product.js
import React from 'react';
import { Text, StyleSheet } from 'react-native';
import { Card, Button } from 'react-native-elements';
import { withNavigation } from 'react-navigation';

class Product extends React.Component {
    render() {
      return (
        <Card
            image={{uri: 'https://vader-prod.s3.amazonaws.com/1543958419-810KAtkwn6L.jpg'}}>
            <Text style={{marginBottom: 10, marginTop: 20 }} h2>
                Kid shoes
            </Text>
            <Text style={styles.price} h4>
                $ 200
            </Text>
            <Text h6 style={styles.description}>
                added 2h ago
            </Text>
            <Button
            type="clear"
            title='Buy now'
            onPress={() => this.props.navigation.navigate('Details')} />
        </Card>
      );
    }
}

const styles = StyleSheet.create({
    name: {
        color: '#5a647d',
        fontWeight: 'bold',
        fontSize: 30
    },
    price: {
        fontWeight: 'bold',
        marginBottom: 10
    },
    description: {
        fontSize: 10,
        color: '#c1c4cd'
    }
});

export default withNavigation(Product);
Let’s use this component in src/views/Home.js:
// src/views/Home.js
import React from 'react';
import { View, StyleSheet } from 'react-native';
import { withNavigation } from 'react-navigation';
import Product from '../components/Product';
class HomeScreen extends React.Component {
render() {
return (
<View style={styles.row}>
<View style={styles.col}>
<Product/>
</View>
</View>
);
}
}
const styles = StyleSheet.create({
row: {
flex: 1,
flexDirection: 'row',
justifyContent: 'center',
},
col: {
flex: 1,
},
});
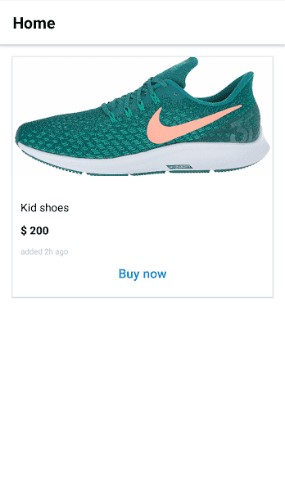
export default withNavigation(HomeScreen);
Tada!
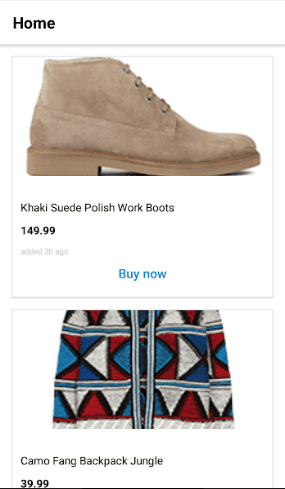
src/views/Home.js file. We can also use it to render a list of products. This is how we can do that:
// src/views/Home.js
import React from 'react';
import { View, StyleSheet, ScrollView } from 'react-native';
import { withNavigation } from 'react-navigation';
import Product from '../components/Product';

const BASE_URL = 'https://raw.githubusercontent.com/sdras/sample-vue-shop/master/dist';

const products = [
  {
    name: 'Khaki Suede Polish Work Boots',
    price: 149.99,
    img: `${BASE_URL}/shoe1.png`
  },
  {
    name: 'Camo Fang Backpack Jungle',
    price: 39.99,
    img: `${BASE_URL}/jacket1.png`
  },
  {
    name: 'Parka and Quilted Liner Jacket',
    price: 49.99,
    img: `${BASE_URL}/jacket2.png`
  },
  {
    name: 'Cotton Black Cap',
    price: 12.99,
    img: `${BASE_URL}/hat1.png`
  },
];

class HomeScreen extends React.Component {
    render() {
      return (
        <ScrollView
          style={{
            flexGrow: 0,
            width: "100%",
            height: "100%",
          }}>
          {
            products.map((product, index) => {
              return(
                <View style={styles.row} key={index}>
                    <View style={styles.col}>
                      <Product/>
                    </View>
                </View>
              )
            })
          }
        </ScrollView>
      );
    }
}

const styles = StyleSheet.create({
  row: {
      flex: 1,
      flexDirection: 'row',
      justifyContent: 'center',
  },
  col: {
      flex: 1,
  },
});

export default withNavigation(HomeScreen);
src/components/Product.js file to display product data.
// src/components/Product.js
import React from 'react';
import { Text, StyleSheet } from 'react-native';
import { Card, Button } from 'react-native-elements';
import { withNavigation } from 'react-navigation';

class Product extends React.Component {
    render() {
      return (
        <Card
            image={{uri: this.props.product.img}}>
            <Text style={{marginBottom: 10, marginTop: 20 }} h2>
                {this.props.product.name}
            </Text>
            <Text style={styles.price} h4>
                {this.props.product.price}
            </Text>
            <Text h6 style={styles.description}>
                added 2h ago
            </Text>
            <Button
            type="clear"
            title='Buy now'
            onPress={() => this.props.navigation.navigate('Details')} />
        </Card>
      );
    }
}

const styles = StyleSheet.create({
    name: {
        color: '#5a647d',
        fontWeight: 'bold',
        fontSize: 30
    },
    price: {
        fontWeight: 'bold',
        marginBottom: 10
    },
    description: {
        fontSize: 10,
        color: '#c1c4cd'
    }
});

export default withNavigation(Product);
I’ll keep this article short. The last two things remaining is:
- Passing data here:
// src/components/Product.js
...
<Button
  type="clear"
  title='Buy now'
  onPress={() => this.props.navigation.navigate('Details')} />
...
Navigating with params with React Navigation is easy:
// src/components/Product.js
...
<Button
  type="clear"
  title='Buy now'
  onPress={() => this.props.navigation.navigate('Details', {
    name: this.props.product.name,
    price: this.props.product.price,
    img: this.props.product.img
  })} />
...
- Add a cart system into our app
- Setup authentication into React Native
- Apply some aesthetics to the UI
now our product detail page looks great:
Summing Up
Here are some suggestions for you to try:
Still, I hope you’ve found this post helpful. f you need, you can check this repo to see the files created throughout this article