Build a RESTful CRUD API Using Node, Express, and MongoDB
In this article, we’ll discuss how to create Restful CRUD API with Node.js, Express, and Mongoose to interact with a MongoDB instance to give your web app superpowers.
Our API will include the following features:
- Handle CRUD operations
- Have an API URL (
http://localhost:3000/tasks - User can update, edit, delete and add tasks directly in the database
- Return JSON data
Creating the API
Before getting started You have to install Mongo locally. To do this, please visit the official download page, you might also like to install Compass, the official GUI for MongoDB.
Let’s get started by the creating directories, files and initializing the project:
mkdir vurcrudappapi
cd vurcrudappapi
touch server.js
Create a folder called API
mkdir apiInside this folder called API, create three separate folders called models, routes, and controllers by running:
mkdir api/controllers
mkdir api/models
mkdir api/routes
Create taskController.js in the api/controller folder, taskRoutes.js in the routes folder, and taskModel in the model folder
touch api/controllers/taskController.js
touch api/model/taskModel.js
touch api/routes/taskRoutes.js
now run the following command to create a package.json file
npm initHere is how our folder structure looks:

Install the dependencies
To install the dependencies for our API execute the following commands:
npm i express cors body-parser mongoose
npm i nodemon --save-dev- CORS is a node.js package for providing a Connect/Express middleware that can be used to enable CORS with various options.
- Body-parser: a Node.js body parsing middleware.
- Mongoose is an Object Data Modeling (ODM) library for MongoDB and Node. js
- Nodemon is a utility that will monitor for any changes in your source and automatically restart your server.
Next, open up package.json and alter the scripts section to read as follows:
"scripts": {
  "start": "nodemon server.js"
},
Setting up the Server
Add the following code to taskController.js:
const mongoose = require('mongoose');
const task = mongoose.model('task');

exports.list_all_tasks = (req, res) => {
  task.find({}, (err, tasks) => {
    if (err) res.send(err);
    res.json(tasks);
  });
};

exports.create_a_task = (req, res) => {
  const newTask = new task(req.body);
  newTask.save((err, task) => {
    if (err) res.send(err);
    res.json(task);
  });
};

exports.read_a_task = (req, res) => {
  task.findById(req.params.taskId, (err, task) => {
    if (err) res.send(err);
    res.json(task);
  });
};

exports.update_a_task = (req, res) => {
  task.findOneAndUpdate(
    { _id: req.params.taskId },
    req.body,
    { new: true },
    (err, task) => {
      if (err) res.send(err);
      res.json(task);
    }
  );
};

exports.delete_a_task = (req, res) => {
  task.deleteOne({ _id: req.params.taskId }, err => {
    if (err) res.send(err);
    res.json({
      message: 'task successfully deleted',
     _id: req.params.taskId
    });
  });
};
In the Code Snippet above we’re importing our model, then defining five functions corresponding to the desired CRUD functionality. you can check mongoose documentation for more information
Add the following code to taskModel.js:
const mongoose = require('mongoose');

const { Schema } = mongoose;

const taskSchema = new Schema(
  {
    task1: {
      type: String,
      required: 'task1 cannot be blank'
    },
    task2: {
      type: String,
      required: 'task2  cannot be blank'
    }
  },
  { collection: 'task' }
);

module.exports = mongoose.model('task', taskSchema);
Similarly, Add the following code to RoutesModel.js:
const taskBuilder = require('../controllers/taskController');

module.exports = app => {
  app
    .route('/tasks')
    .get(taskBuilder.list_all_tasks)
    .post(taskBuilder.create_a_task);

  app
    .route('/tasks/:taskId')
    .get(taskBuilder.read_a_task)
    .put(taskBuilder.update_a_task)
    .delete(taskBuilder.delete_a_task);
};
In the code snippet, we are defining following routes
- GET
/tasks—return a list of all tasks - POST
/tasks—create a new task - GET
/tasks/:taskId—get a single task - PUT
/task/:taskId—update a single task - DELETE
/tasks/:taskId—delete a single task
Finally, Open up server.js and add the following code:
const express = require('express');
const cors = require('cors');
const mongoose = require('mongoose');
const bodyParser = require('body-parser');

global.Task = require('./api/models/taskModel');
const routes = require('./api/routes/taskRoutes');

mongoose.Promise = global.Promise;
mongoose.set('useFindAndModify', false);
mongoose.connect(
  'mongodb://localhost/Vuecrudapp',
  { useNewUrlParser: true }
);

const port = process.env.PORT || 3000;
const app = express();

app.use(cors());
app.use(bodyParser.urlencoded({ extended: true }));
app.use(bodyParser.json());

routes(app);
app.listen(port);

app.use((req, res) => {
  res.status(404).send({ url: `${req.originalUrl} not found` });
});

console.log(`Server started on port ${port}`);
In the code snippet above, we are using Mongoose’s connect method to connect to our database Vuecrupsapp which I have created using mongo Compass, before creating a new Express app and telling it to use the bodyParser and cors middleware.
We then tell it to use the routes we defined in api/routes/taskRoutes.js and to listen for connections on port 3000. Finally, we define a function to deal with nonexistent routes.
Now, start the node and MongoDB server by executing the following commands:
npm run start
mongod
Testing the RESTful CRUD API
Start the PostMan App to test create the method of our API
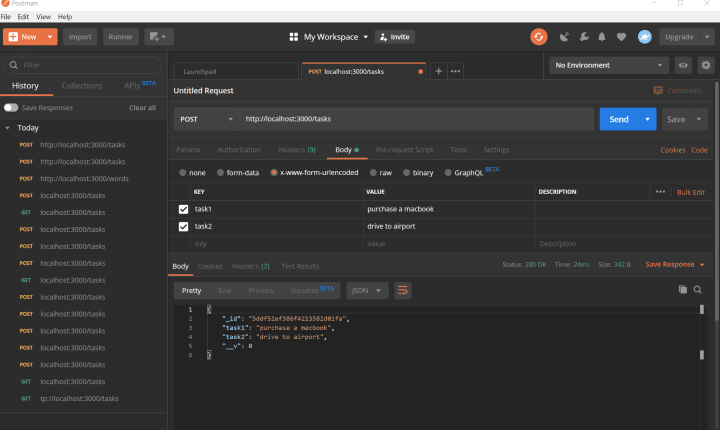
We’ll start off by creating a new Tasks lists. Select POST as the method and enter http://localhost:3000/tasks as the URL.
Now, enter two key pairs into the fields below and press Send. you will receive the newly created object from the server by way of a response.
You can read the implementation of this API to Vuecrud App.
Conclusion
I hope you learned to create a Restful CRUD API with Node.js. Every article can be made better, so please leave your suggestions and contributions in the comments below. If you have questions about any of the steps, please do ask also in the comments section below.
You can access CodeSource from here.

