Build a network monitoring app using React
In this tutorial, we will learn to build a simple network monitoring app using React Hooks.
Use case
Sometime while using our React application a user connects with a network with no data connection. In that case your app must show the user network connection status.
Pre-requisite
- Basic understanding of JavaScript ES6
- Basic understanding of HTML and CSS
- Have Nodejs installed on your machine
React Application
We are going to use create-react-app as our base application. If you’ve previously installed create-react-app globally via npm install -g create-react-app, we recommend you uninstall the package using npm uninstall -g create-react-app to ensure that npx always uses the latest version.
npx create-react-app networkmonitorInstall semantic-ui-react
For this project, we are using semantic-ui css. Semantic UI React provides the react component which has already configured semantic-ui css. In short, you don’t have to align a component or adjust the margin.
For this tutorial we just have to add the cdn of semantic-ui here. Open the index.html from the public folder and Paste the cdn in the head tag.
<link rel="stylesheet" href="//cdn.jsdelivr.net/npm/semantic-ui@2.4.2/dist/semantic.min.css"/>
Creating a React Hook
Create a new file called onlinestatus.js inside the src folder. For our app to work we need to write a code that runs when the browser loses or regains a connection to the network. For that purpose we will use body-level events called online and offline .
import {useEffect, useState} from "react";

export default () => {
    const [online, networkStatus] = useState(navigator.onLine);

    useEffect(() => {
        if (window.addEventListener) {
            window.addEventListener("online", () => networkStatus(true), false);
            window.addEventListener("offline", () => networkStatus(false), false);
        } else {
            document.body.ononline = () => networkStatus(true);
            document.body.onoffline = () => networkStatus(false);
        }
    }, []);

    return online;
}
In the React hook above we created, First we register listeners to the browser’s online/offline events and When either of these events occurs, we can set the value of online to true or false.
Using the React Hook
Now update the code of App.js with the following:
import useOnline from "./onlinestatus";

import "./App.css";

function App() {
  const online = useOnline();

  return (
    <div className="App">
      <h3 class="ui center aligned icon header">
        <i class="circular plug icon"></i>
        React network Monitor
      </h3>

      <div class="ui two column centered grid">
        <span>
          {online ? (
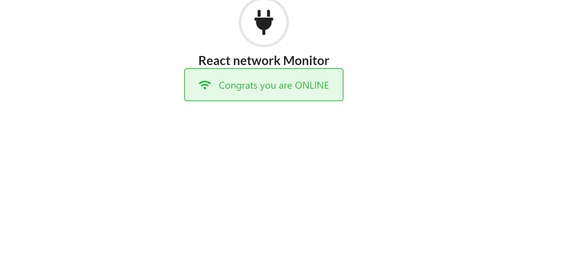
            <div className="ui green message">
              {" "}
              <i class="wifi icon"> </i> Congrats you are ONLINE
            </div>
          ) : (
            <div className="ui red message">
              {" "}
              <i class="meh icon"> </i> please check your network connection
            </div>
          )}
        </span>{" "}
      </div>
    </div>
  );
}

export default App;

export default App;
In the code snippet above are importing the hook we created earlier to our component and our React hook manages its connection state in the online variable.
Now, Open the terminal in the project directory and start the application.
npm start
 or
yarn start
Conclusion
Congratulations, You have successfully created a simple network monitoring app using React. It’s worth noting that our app only checks browser connection to the internet. you can also extend this application to check the connection to server and beyond by writing additional code.
Further, Every article can be made better, so please leave your suggestions and contributions in the comments below. If you have questions about any of the steps, please do ask also in the comments section below.
You can access CodeSource from here.

