

Build a simple login page and dashboard with Flutter
In this article, we will build a simple login page and dashboard with Flutter.
There are only login pages and dashboards, if the user tap on the login button, the app will go to the dashboard, if tap on logout, the app will go back to the login page, simple enough.
Before that, we need to prepare some assets, like images for profile photo and logo, I’ll attach assets on the last of the article. Then create a project with name simple_login_page, you can create with this command:
flutter create simple_login_pageNext, make a new directory with name assets inside the project directory, and copy all assets’ files to that directory. Don’t forget to register the assets in pubspec.yaml. Open your text editor, I’m using VSCode, edit pubspec.yaml become like this:
flutter:
  uses-material-design: true
  assets:
    - assets/ac-logo.png
    - assets/ac-arno-dorian.jpg
Open file main.dart inside of lib directory, and change to this:
import 'package:flutter/material.dart';

void main() => runApp(MyApp());

class MyApp extends StatelessWidget {
  @override
  Widget build(BuildContext context) {
    return MaterialApp(
      title: 'Flutter Simple Login Page',
      theme: ThemeData(
        primarySwatch: Colors.blue,
      ),
      home: null,
    );
  }
}
Create a new file inside lib directory with name login_page.dart, and then create stateful widget inside of it with name LoginPage. On this page, we will need some widget for logo image, input field email, input field password, and button for login and forgot password. You can see the code and write it below of build method:
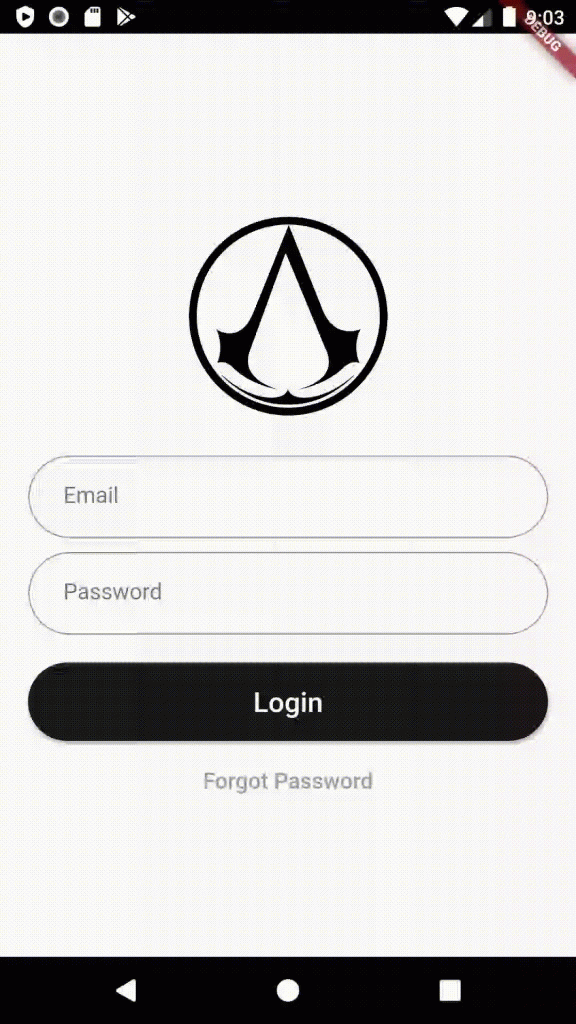
Make a Simple Login Page with Flutter
- Logo
For logo widget I use the Hero widget, you can set the tag with ‘hero’, and then the child uses the ImageAsset to get the asset that we define in the first step.
    final logo = Padding(
      padding: EdgeInsets.all(20),
        child: Hero(
        tag: 'hero',
        child: SizedBox(
          height: 160,
          child: Image.asset('assets/ac-logo.png'),
        )
      ),
);- Input Email and Password
Between email and password almost the same, both of them use the TextField widget. The differences are only thekeyboardType, and we have to add obscure text to the input password to hide the characters.
    final inputEmail = Padding(
      padding: EdgeInsets.only(bottom: 10),
      child: TextField(
        keyboardType: TextInputType.emailAddress,
        decoration: InputDecoration(
          hintText: 'Email',
          contentPadding: EdgeInsets.symmetric(horizontal: 25, vertical: 20),
          border: OutlineInputBorder(
            borderRadius: BorderRadius.circular(50.0)
          )
        ),
      ),
    );

    final inputPassword = Padding(
      padding: EdgeInsets.only(bottom: 20),
      child: TextField(
        keyboardType: TextInputType.text,
        obscureText: true,
        decoration: InputDecoration(
          hintText: 'Password',
          contentPadding: EdgeInsets.symmetric(horizontal: 25, vertical: 20),
          border: OutlineInputBorder(
            borderRadius: BorderRadius.circular(50.0)
          )
        ),
      ),
);- Button Login
We can use the RaisedButton widget, but we need to wrap it first with the ButtonTheme so we can set the button height. Button shape is needed to make a border’s button to be rounded, the RoundedRectangleBorder widget can handle this.
    final buttonLogin = Padding(
      padding: EdgeInsets.only(bottom: 5),
      child: ButtonTheme(
        height: 56,
        child: RaisedButton(
          child: Text('Login', style: TextStyle(color: Colors.white, fontSize: 20)),
          color: Colors.black87,
          shape: RoundedRectangleBorder(
            borderRadius: BorderRadius.circular(50)
          ),
          onPressed: () => {
          },
        ),
      ),
);- Button Forgot Password
For this button, we will make it minimalist with just show the title. We can use widget FlatButton for this.
    final buttonForgotPassword = FlatButton(
      child: Text('Forgot Password', style: TextStyle(color: Colors.grey, fontSize: 16),),
      onPressed: null
    );
If all widgets are ready, now we can put them inside the widget ListView’s children:
    return SafeArea(
      child: Scaffold(
        body: Center(
          child: ListView(
            shrinkWrap: true,
            padding: EdgeInsets.symmetric(horizontal: 20),
            children: <Widget>[
              logo,
              inputEmail,
              inputPassword,
              buttonLogin,
              buttonForgotPassword
            ],
          ),
        ),
      )
    );
Then the full code of login_page.dart file will be like this:
import 'package:flutter/material.dart';

class LoginPage extends StatefulWidget {
  @override
  _LoginPageState createState() => _LoginPageState();
}
class _LoginPageState extends State<LoginPage> {
  @override
  Widget build(BuildContext context) {
    final logo = Padding(
      padding: EdgeInsets.all(20),
        child: Hero(
        tag: 'hero',
        child: CircleAvatar(
          radius: 56.0,
          child: Image.asset('assets/ac-logo.png'),
        )
      ),
    );
    final inputEmail = Padding(
      padding: EdgeInsets.only(bottom: 10),
      child: TextField(
        keyboardType: TextInputType.emailAddress,
        decoration: InputDecoration(
          hintText: 'Email',
          contentPadding: EdgeInsets.symmetric(horizontal: 25, vertical: 20),
          border: OutlineInputBorder(
            borderRadius: BorderRadius.circular(50.0)
          )
        ),
      ),
    );
    final inputPassword = Padding(
      padding: EdgeInsets.only(bottom: 20),
      child: TextField(
        keyboardType: TextInputType.emailAddress,
        obscureText: true,
        decoration: InputDecoration(
          hintText: 'Password',
          contentPadding: EdgeInsets.symmetric(horizontal: 25, vertical: 20),
          border: OutlineInputBorder(
            borderRadius: BorderRadius.circular(50.0)
          )
        ),
      ),
    );
    final buttonLogin = Padding(
      padding: EdgeInsets.only(bottom: 5),
      child: ButtonTheme(
        height: 56,
        child: RaisedButton(
          child: Text('Login', style: TextStyle(color: Colors.white, fontSize: 20)),
          color: Colors.black87,
          shape: RoundedRectangleBorder(
            borderRadius: BorderRadius.circular(50)
          ),
          onPressed: () => {

          },
        ),
      ),
    );
    final buttonForgotPassword = FlatButton(
      child: Text('Forgot Password', style: TextStyle(color: Colors.grey, fontSize: 16),),
      onPressed: null
    );
    return SafeArea(
      child: Scaffold(
        body: Center(
          child: ListView(
            shrinkWrap: true,
            padding: EdgeInsets.symmetric(horizontal: 20),
            children: <Widget>[
              logo,
              inputEmail,
              inputPassword,
              buttonLogin,
              buttonForgotPassword
            ],
          ),
        ),
      )
    );
  }
}
Make a Simple Login Page with Flutter
Part of the login page has done, next, we will make the dashboard page. This page will show if the user taps the login button. Only need a few widgets on this page, just widget for image profile and widget text for description.
Still, in lib directory create a new file called dashboard.dart and make a stateless widget with name Dashboard. Write the script below:
- User Avatar
To make avatar actually the same with our logo’s widget. Important to note, you need to set the hero tag to be the same with the logo’s hero tag.
    final avatar = Padding(
      padding: EdgeInsets.all(20),
      child: Hero(
        tag: 'logo',
        child: SizedBox(
          height: 160,
          child: Image.asset('assets/ac-arno-dorian.png'),
        )
      ),
);- User Description
This will show the description’s text, but I need to make the text-justify so we will use theRichTextwidget.
    final description = Padding(
      padding: EdgeInsets.all(10),
      child: RichText(
        textAlign: TextAlign.justify,
        text: TextSpan(
          text: 'Anim ad ex officia nulla anim ipsum ut elit minim id non ad enim aute. Amet enim adipisicing excepteur ea fugiat excepteur enim veniam veniam do quis magna. Cupidatat quis exercitation ut ipsum dolor ipsum. Qui commodo nostrud magna consectetur. Nostrud culpa laboris Lorem aliqua non ut veniam culpa deserunt laborum occaecat officia.',
          style: TextStyle(color: Colors.black, fontSize: 20)
        ),
      ),
);- Button Logout
Same with button forgot password, just change the text title.
    final buttonLogout = FlatButton(
      child: Text('Logout', style: TextStyle(color: Colors.black87, fontSize: 16),),
      onPressed: () {

      }
    );
Next, put them inside the widget ListView’s children:
    return SafeArea(
      child: Scaffold(
        body: Center(
          child: ListView(
            shrinkWrap: true,
            padding: EdgeInsets.symmetric(horizontal: 20),
            children: <Widget>[
              avatar,
              description,
              buttonLogout
            ],
          ),
        ),
      )
    );
So our full code for dashboard.dart will be like this:
import 'package:flutter/material.dart';

class Dashboard extends StatelessWidget {
  @override
  Widget build(BuildContext context) {
    final avatar = Padding(
      padding: EdgeInsets.all(20),
        child: Hero(
        tag: 'logo',
        child: SizedBox(
          height: 160,
          child: Image.asset('assets/ac-arno-dorian.png'),
        )
      ),
    );
    final description = Padding(
      padding: EdgeInsets.all(10),
      child: RichText(
        textAlign: TextAlign.justify,
        text: TextSpan(
          text: 'Anim ad ex officia nulla anim ipsum ut elit minim id non ad enim aute. Amet enim adipisicing excepteur ea fugiat excepteur enim veniam veniam do quis magna. Cupidatat quis exercitation ut ipsum dolor ipsum. Qui commodo nostrud magna consectetur. Nostrud culpa laboris Lorem aliqua non ut veniam culpa deserunt laborum occaecat officia.',
          style: TextStyle(color: Colors.black, fontSize: 20)
        ),
      ),
    );
    final buttonLogout = FlatButton(
      child: Text('Logout', style: TextStyle(color: Colors.black87, fontSize: 16),),
      onPressed: () {

      }
    );
    return SafeArea(
      child: Scaffold(
        body: Center(
          child: ListView(
            shrinkWrap: true,
            padding: EdgeInsets.symmetric(horizontal: 20),
            children: <Widget>[
              avatar,
              description,
              buttonLogout
            ],
          ),
        ),
      )
    );
  }
}
Make a Simple Login Page with Flutter
Login page and dashboard page are ready, but we need a little step to make both of them be connected, we will define a navigator route. Follow these steps:
- On main.dart, import login_page.dart, and then on line 13 change the value from null to be LoginPage().
- On login_page.dart, import dashboard.dart and add navigator route to the onPressed method of
buttonLogin, you can see at line 58. Here the script:
Navigator.pushReplacement(context, MaterialPageRoute(builder: (context) => Dashboard()));- On dashboard.dart, import login_page.dart and add navigator route to the onPressed method of buttonLogout, you can see in line 29. Here the script:
Navigator.pushReplacement(context, MaterialPageRoute(builder: (context) => LoginPage()));And it’s done, you can try to run the application on the emulator or real device. In conclusion, creating the login page you need to set the navigator route with pushReplacement to make an application can not go back after login or logout, with ImageAsset widget will make the application not need to fetch the image from the internet, and RichText widget to make us more flexible to set our text. You can get a full source code on Github here.