Build a CRUD Application with React and Apollo GraphQL
GraphQL is a query language for APIs and a runtime for fulfilling those queries with your existing data. It provides a simple interface for asking for data from your server and getting exactly what was requested and nothing more. In contrast, if you are using a REST API for your server you have no control of what is returned.
Let’s look at an example. Let’s say your app needs to fetch a user’s details from the server. Using REST, your response may look like this:
{
  user_details: {
    id: 6678,
    name: “John Doe”,
    email: “johndoe@example.com”
  }
}
With GraphQL, you can request for exactly the data you want and be sure you’ll get only what you asked for. Assuming what you need is the just the user’s name, your response would look like this:
{
  user_details: {
    name: “John Doe”
  }
}
Besides this, REST gives you various endpoints depending on the functionality to be achieved. With GraphQL, you get just one endpoint which you send queries and mutations to manipulate your data. We’ll cover these in subsequent paragraphs. Let’s get started.
Prerequisites
For this tutorial, we’ll have two servers running: one serving our backend and the second serving our React Crud application. We’ll start with the backend first.
Take a look at the Crud app we will be building:
Setup Apollo Server
GraphQL is a specification that describes how to client and server interact to manipulate data. As such, there are different implementations for various languages that are built on this specification. The one we’ll be using in the tutorial is Apollo GraphQL. One of the benefits is that it has implementations for Java, JavaScript, and Swift so you can use it across your different clients without having to change much. Also, it’s relatively straightforward to get started.
From your terminal, create a new directory and install the required packages:
mkdir todo-graphql && cd todo-graphqlInside this directory, create another folder:
mkdir serverserver will contain our GraphQL server. Switch to the server folder in your terminal and install the following:
cd server
npm install --save express apollo-server-express cors
Create a file in the root directory called server.js and add the following:
const express = require('express');
const { ApolloServer, gql } = require('apollo-server-express');
const cors = require('cors');

let todos = [
  {
    id: 0,
    text: 'Hello from GraphQL',
    completed: false,
  },
];
We import the packages installed in the previous step. We use the cors package because we want to be able to make requests from other origins.
The application we’ll be creating is a todo list application that would keep track of todos and if they have been completed or not. We’ll store todos in an array but the array can be substituted for a database or file. To keep things simple, we’ll be using an array.
Each todo has an id, text, and completed. So far so good.
Add the following after todos:
const typeDefs = gql`
  type Todo {
    id: String
    text: String
    completed: Boolean
  }
  type Query {
    todos: [Todo]!
  }
  type Mutation {
    createTodo(text: String!):String
    removeTodo(id: String!):String
  }
`;
First, we define a schema called Todo. This is basically a model for a Todo. Next, we define our query. We have just one query todos which contain an array of Todo we defined earlier. The (!) at the end signifies that it will always return something.
You can think of a query as the way you fetch data from a GraphQL server. It’s like a GET request in REST. This query will fetch todos from the server that will be used to populate the client app.
We also define 2 mutations. A mutation is a way to update data on the server. The first mutation we have is createTodo. It accepts one parameter text, which must be a String. It then returns a string after it’s finished. The same thing goes for removeTodo.
These type definitions created using the gql`` helper function.
Next, we add the resolvers.
const resolvers = {
  Query: {
    todos: () => todos,
  },
  Mutation: {
    createTodo: (parent, args, context, info) => {

      return todos.push({
        id: Date.now().toString(),
        text: args.text,
        completed: false,
      });
    },
    removeTodo: (parent, args, context, info) => {
      for (let i in todos) {
        if (todos[i].id === args.id) {
          todos.splice(i, 1);
        }
      }
      return args.id;
    }
  }
};
Resolvers are the functions that run when queries and mutations are made. This is where you would fetch and manipulate the data that’s returned to the client. todos query returned the array of todos. Mutations receive 4 arguments but we particularly interested in args, which contains the data passed from the client. We use that data to manipulate the array of todos and return a result.
const server = new ApolloServer({ typeDefs, resolvers });

const app = express();
server.applyMiddleware({ app });

app.use(cors());

app.listen({ port: 4000 }, () =>
  console.log('Now browse to http://localhost:4000' + server.graphqlPath)
);
Lastly, we pass the type definitions and resolvers to create our ApolloServer. We also make sure to use cors() to allow cross-origin requests. Then we serve our app on port 4000.
To make sure our server reflects changes when we make changes to the files, we’ll install another package.
npm install --save nodemonThen add the following to the scripts section of your package.json
"scripts": {
  "start": "nodemon server.js"
}
From the terminal, run npm start
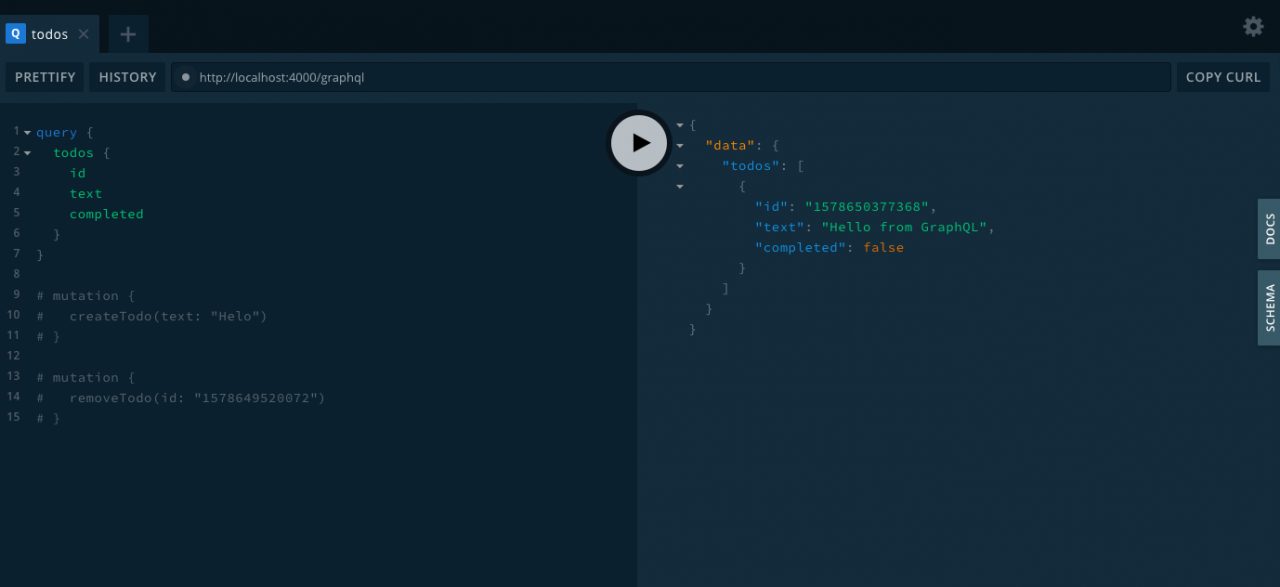
If everything was set up correctly, you should see Now browse to http://localhost:4000/graphql in your terminal. That link is where we would be sending all queries and mutations from the client app.

Navigating to that URL gives you an interactive shell where you can run test your queries and mutations before integrating into your client app.
Creating the React App
So far we’ve been able to set up the server and run queries from the interactive shell. Let’s create the React app that will make use of our API.
npx create-react-app clientThis will create a new React project and install the necessary packages required to run react applications. Next, we’ll install Apollo Client and some other helpful packages.
cd client
yarn add apollo-boost @apollo/react-hooks graphql-tag
That’s all we’ll need.
Open up src/index.js. Remove everything there and add the following.
Open up src/index.js. Remove everything there and add the following.

import React from 'react';
import ReactDOM from 'react-dom';
import './index.css';
import App from './App';

import ApolloClient from "apollo-boost";
import { ApolloProvider } from "@apollo/react-hooks";

const client = new ApolloClient({
  uri: "http://localhost:4000/graphql"
});

ReactDOM.render(<ApolloProvider client={client}><App /></ApolloProvider>, document.getElementById('root'));
We create an ApolloClient and pass in the endpoint of our GraphQL server. Then we wrap our app with ApolloProvider which would expose the client throughout the app.
Open up src/App.js, clear everything in it and add the following:
import React from 'react';
import './App.css';
import { useQuery, useMutation } from '@apollo/react-hooks';
import gql from "graphql-tag";
We import all the packages we’ll need. We’ll be using react hooks which allows us to use things like state without having to create class components.
Below that, add the following:
const READ_TODOS = gql`
  query todos{
    todos {
      id
      text
      completed
    }
  }
`;

const CREATE_TODO = gql`
  mutation CreateTodo($text: String!) {
    createTodo(text: $text)
  }
`;

const REMOVE_TODO = gql`
  mutation RemoveTodo($id: String!) {
    removeTodo(id: $id)
  }
`;
Here we define all the queries and mutations. Let’s start making use of them.
Fetching Data with Queries
function App() {

  const { data, loading, error } = useQuery(READ_TODOS);

  if (loading) return <p>loading...</p>;
  if (error) return <p>ERROR</p>;
  if (!data) return <p>Not found</p>;

  return (
    <div className="app">
      <h3>Create New Todo</h3>
      <form onSubmit={}>
        <input className="form-control" type="text" placeholder="Enter todo"></input>
        <button className="btn btn-primary px-5 my-2" type="submit">Submit</button>
      </form>
      <ul>
        {data.todos.map((todo) =>
          <li key={todo.id}>
            <span className={todo.completed ? "done" : "pending"}>{todo.text}</span>
            <button className="btn btn-sm btn-danger rounded-circle float-right" onClick={}>X</button>
          </li>
        )}
      </ul>
    </div>
  );
}

export default App;
This is the rest of our markup so let’s walk through the code step by step. At the very top, we useQuery to read our todos from the server. We use object destructuring to get data, loading, error which we use to update the UI in the subsequent step.
In our markup, we have a form that contains input and a button (not functional yet). Under that, we have our list of todos with each todo containing a button to delete (also not functional). We loop through data.todos which contains the todos fetch from the server.
Writing Data with Mutations
We’ve already seen how we can read data from the server. Let’s send some data back to the server using mutations.
We imported useMutation in the previous step so add the following just under useQuery:
let input;
const [createTodo] = useMutation(CREATE_TODO);
Modify the form like so:
<form onSubmit={e => {
    e.preventDefault();
    createTodo({ variables: { text: input.value } });
    input.value = '';
    window.location.reload();
}}>
    <input className="form-control" type="text" placeholder="Enter todo" ref={node => { input = node; }}></input>
    <button className="btn btn-primary px-5 my-2" type="submit">Submit</button>
</form>
We pass in CREATE_TODO created earlier to useMutation and pass the result of that to createTodo. In our markup, we bind the value of the input field to the input variable. In the form onSubmit, we pass in the value of the input to createTodo and clear the input field.
And that’s all we need to add a new todo.
Delete a Todo Item
Again, we create a mutation deleteTodo with useMutation.
const [deleteTodo] = useMutation(REMOVE_TODO);Then we modify the button to use this mutation. The button passes the id of the todo to our server which in turn deletes it.
<ul>
    <button className="btn btn-sm btn-danger rounded-circle float-right" onClick={() => {
      deleteTodo({ variables: { id: todo.id } });
      window.location.reload();
    }}>X</button>
</ul>
Updating the todo completed state is quite similar. All that’s required is the id of the todo and updating the completed property of the todo.
Conclusion
GraphQL is quite exciting as it tackles some of the issues with REST. Using Apollo GraphQL gives us the flexibility to use GraphQL with ease without too much overhead cost.
The full source is on GitHub so you can check it out there.
