Add Push Notifications to a Web App with Firebase
Traditionally, one of the main ways to bring users back to your website/web app is through email newsletters. While email newsletters can be used effectively, the Clickthrough Rate (CTR) when compared to web push notifications is significantly less.
When used appropriately, web push notifications can drive more engagement to your web app. In this tutorial, I’ll show you how to add this functionality to your web app.
What you’ll learn
- How to subscribe and unsubscribe a user for push messaging with Firebase
- How to handle incoming push messages
- How to display a notification
- How to respond to notification clicks
- How to send push notifications using cloud functions
Prerequisites
- Chrome 52 or above
- A Web Server
- A text editor
- Basic knowledge of HTML, CSS, JavaScript
- Firebase CLI
- The sample code
- Create a project on Firebase
Get Setup
You need to create and set up a firebase project.
Install Firebase CLI
From your terminal, run:
npm install -g firebase-toolsIf you don’t have it installed already.
Once installed, run:
firebase loginIf you’ve just installed it for the first time and follow the prompts.
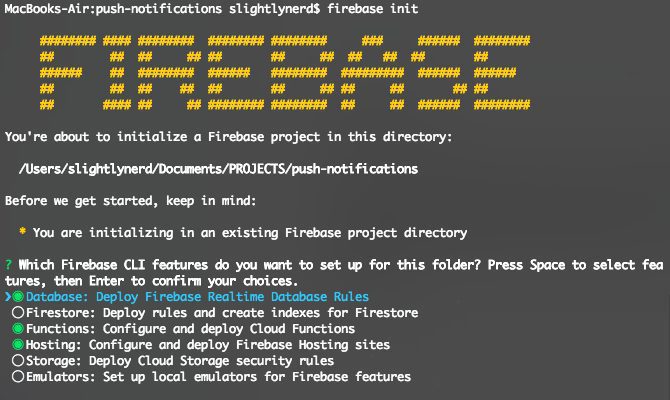
The next step is to initialize the project. For this tutorial, we’ll be using the firebase realtime database, cloud functions and hosting. Change to the project directory and run:
firebase init
Follow the prompts and install the necessary packages.
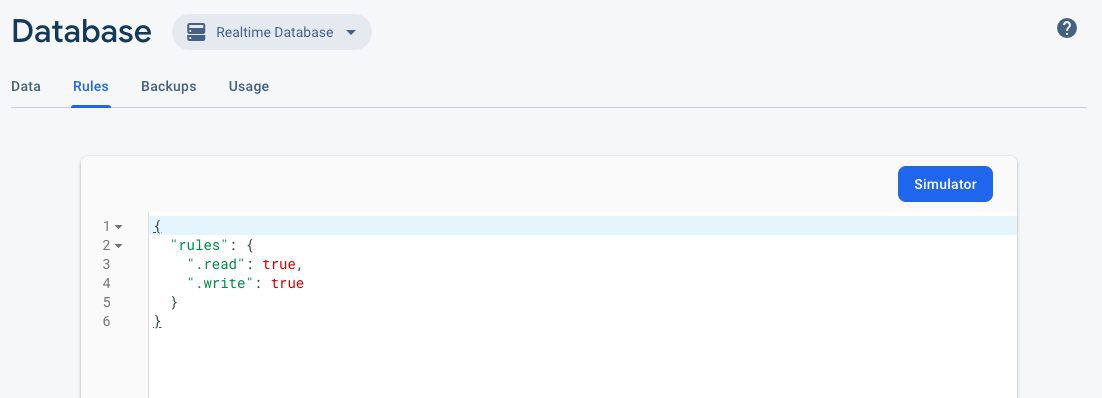
On the firebase console, switch to the database tab and set your database rules like so:

With that setup, we can start building the app.
Register Service Worker
In the sample code, you’ll see a file named firebase-messaging-sw.js. We’ll register this as our service worker in main.js.
const registerServiceWorker = () => {
  if ('serviceWorker' in navigator) {
    navigator.serviceWorker
      .register('./firebase-messaging-sw.js')
      .then(function (registration) {
        console.log('Registration successful, scope is:', registration.scope);
      })
      .catch(function (err) {
        console.log('Service worker registration failed, error:', err);
      });
  }
};
This code checks if service worker is supported by the browser, and registers our service worker if it is supported. Call the function by adding this to the end of the file:
registerServiceWorker();Initialize App

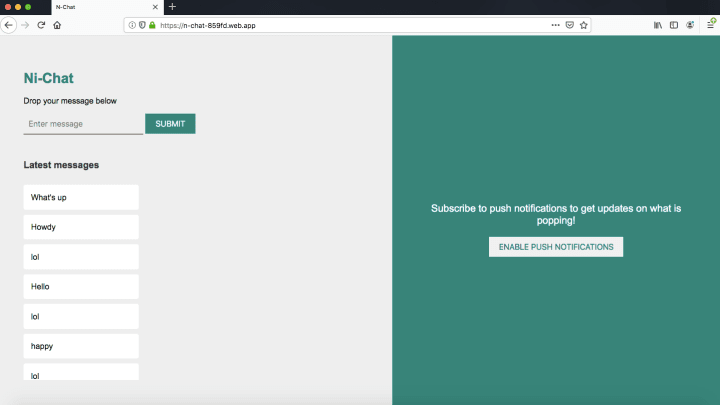
The first thing we need to do is to initialize the UI of our app. We need to check if push notification is supported, enable the subscribe button which is disabled by default and fetch previous messages from the database. Let’s add some code.
This code initializes firebase for us to start using its functions.
// Get a reference to the database service
const db = firebase.database();
// Get a reference to firebase messaging and initialize it
const messaging = firebase.messaging();
We set up the database and messaging services.
const pushBtn = document.getElementById('pushBtn');
pushBtn.addEventListener('click', () => {
  if (Notification.permission === 'granted') {
    unsubscribeUser();
  }
  else {
    subscribeUser();
  }
});
If the user is already subscribed to push notifications, we call the unsubscribe function, else we subscribe the user when the button is clicked.
const initializeUI = async () => {
  // check if notifications are supported
  if ('Notification' in window) {
    pushBtn.disabled = false;
    switch (Notification.permission) {
      case 'granted':
        pushBtn.innerText = 'Disable push notifications';
        break;
      case 'denied':
        pushBtn.innerText = 'Push notifications blocked';
        pushBtn.disabled = true;
        break;
      default:
        pushBtn.innerText = 'Enable push notifications';
        break;
    }
    navigator.serviceWorker.addEventListener('message', ({ data }) => {
      console.log(data);
    });
  }
  else {
    pushBtn.innerText = 'Push messaging not supported by this browser';
  }
  // fetch messages from database
  readMessages();
};
Let’s walk through this code since there is quite a bit going on here. The code checks if push notifications are supported. If supported, we enable the button to subscribe/unsubscribe the user. We call updateBtn() to update the button’s state. Then we add an event listener for the message event which is triggered anytime the browser receives a push notification. If notification is not supported, the button remains disabled and we update the text to let the user know.
We also listen for the message event that’s fired anytime the browser receives a new push message. Then we log the message to the console. The good thing about this is that when the web app is in the background, the browser shows a nice prompt to the user.

Then we read the messages from the database.
const updateBtn = async () => {
  const token = await getMessageToken();
  if (!token) {
    pushBtn.innerText = 'Enable push notifications';
  }
  else {
    pushBtn.innerText = 'Disable push notifications';
  }
};
updateBtn function simply checks if there is a push notification token and updates the button text.
const getMessageToken = () => {
  return new Promise((resolve, reject) => {
    messaging.getToken().then((currentToken) => {
      if (currentToken) {
        resolve(currentToken);
      }
      else {
        reject(null);
      }
    });
  })
};
getMessageToken is a built-in function of Firebase messaging that gets the user’s messaging token from the messaging instance we created earlier.
Subscribe the User
We already added an event listener for when the button is clicked which calls either subscribeUser or unsubscribeUser. Let’s write the code for subscribeUser.
const subscribeUser = () => {
  console.log('Requesting notifications permission...');
  messaging.requestPermission().then(() => {
    // Notification permission granted.
    saveMessagingDeviceToken();
    updateBtn();
  }).catch(function (error) {
    console.error('Unable to get permission to notify.', error);
    pushBtn.disabled = true;
  });
};
We request for permission to show notifications to the user. If granted we update the button text and save the token to firebase. Else, we disable the button.
Note: Once notifications are denied, there is no way to prompt the user to enable it again. The user has to manually reset their preferences hence care should be taken on when and how to prompt a user for permission.
Push notification subscription token expires occasionally so it’s recommended that you refresh the token when it changes. Luckily, firebase provides an intuitive way of doing it.
messaging.onTokenRefresh(() => {
  messaging.getToken().then((currentToken) => {
    saveUserToken(currentToken);
  });
});
Unsubscribe the User
Deleting a user’s token is as simple as calling deleteToken on the messaging instance.
const unsubscribeUser = () => {
  messaging.getToken().then((currentToken) => {
    deleteUserToken();
  });
};

const deleteUserToken = () => {
  ...
        messaging.deleteToken(currentToken).then(() => {
          db.ref('/fcmTokens/' + key).set(null);
          updateBtn();
        });
  ...
};
Send Push Notifications with Cloud Functions
Everything done so far enables the web app to receive push notifications and display them. We’ve not written the logic to handle sending push notifications to subscribed users.
Firebase provides us with a serverless environment. With Firebase, anytime a new message gets added to the database you can write some code that responds to that event. This is exactly what we’ll do.
During the setup, we already set up the project to start writing cloud functions after running firebase init. This created a folder called functions. Open index.js in that folder, remove the comments and add the following code.
// Sends a notifications to all users when a new message is posted.
exports.sendNotifications = functions.database.ref('/messages/{msgID}').onCreate(
  async (snapshot) => {
    // Notification details.
    const text = snapshot.val().text;
    const payload = {
      notification: {
        title: `New message`,
        body: text ? (text.length <= 100 ? text : text.substring(0, 97) + '...') : '',
        icon: 'firebase-logo.png',
        click_action: 'YOUR-APP-URL'
      }
    };

    // Get the list of device tokens.
    const tokens = [];
    await admin.database().ref('/fcmTokens').once('value', snapshot => {
      snapshot.forEach(childSnapshot => {
        tokens.push(childSnapshot.val().id)
      });
    });

    if (tokens.length > 0) {
      // Send notifications to all tokens.
      const response = await admin.messaging().sendToDevice(tokens, payload);
      await cleanupTokens(response, tokens);
      console.log('Notifications have been sent');
    }
  });
Let’s walk through what this code does.
exports.sendNotifications = functions.database.ref('/messages/{msgID}').onCreate(async (snapshot) => {
  ...
});
We get a reference to the database path where messages are stored. Then we set a listener for the onCreate event, which fires anytime a new item gets added to the database.
const text = snapshot.val().text;
const payload = {
  notification: {
    title: `New message`,
    body: text ? (text.length <= 100 ? text : text.substring(0, 97) + '...') : '',
    icon: '/firebase-logo.png',
    click_action: 'https://n-chat-859fd.web.app'
  }
};
This code gets the new message added to the database. Then we use it to create an object that contains the details of the notification.
- title – the title of the notification
- body – contains the notification body
- icon – path to the web app icon that’s shown in the notification
- click_action – contains the URL that’s opened when the notification is clicked.
// Get the list of device tokens.
const tokens = [];
await admin.database().ref('/fcmTokens').once('value', snapshot => {
  snapshot.forEach(childSnapshot => {
    tokens.push(childSnapshot.val().id);
  });
});
This code fetches all the tokens stored in the database.
if (tokens.length > 0) {
  const response = await admin.messaging().sendToDevice(tokens, payload);
  await cleanupTokens(response, tokens);
  console.log('Notifications have been sent');
}
We check if there are tokens and then send notifications to each device in the array using sendToDevice.
cleanUpTokens is a function that gets the responses of each token and removes invalid tokens from the database. Here’s the code for the function:
function cleanupTokens(response, tokens) {
  const tokensDelete = [];
  response.results.forEach((result, index) => {
    const error = result.error;
    if (error) {
      console.error('Failure sending notification to', tokens[index], error);
      if (error.code === 'messaging/invalid-registration-token' ||
        error.code === 'messaging/registration-token-not-registered') {
        const deleteTask = admin.database().ref(`/fcmTokens/${tokens[index]}`).set({ id: null });
        tokensDelete.push(deleteTask);
      }
    }
  });
  return Promise.all(tokensDelete);
}
Deploy to Firebase
We’ve written the cloud function. The last step is to deploy it to Firebase. Run the following from the terminal:
firebase deployThis would deploy both the cloud function and deploy your site to Firebase. Once deployed, it logs out the hosting URL which you can visit to see your web app.
